Friday, October 15, 2021

Custom Commands in Cypress

 There are different useful commands in cypress. The necessary commands are as follows.


Installation Cypress:
npm install cypress --save-dev

Installation cypress-file-upload:
npm install --save-dev cypress-file-upload

Installation Chai:
npm install chai --save-dev 


HTML Mocha Report Generation:

Installation Mocha
npm install mocha --save-dev

Installation cypress-multi-reporters
npm install cypress-multi-reporters --save-dev

Installation mocha-awesome
npm install mochawesome --save-dev

Installation mocha-awesome-merge
npm install mochawesome-merge --save-dev

Installation mocha-awesome-report-generator
npm install mochawesome-report-generator --save-dev


npx browserslist@latest --update-db

 npm install caniuse-lite

Set-ExecutionPolicy -Scope Process -ExecutionPolicy RemoteSigned

npm cache clean

Wednesday, September 15, 2021

How to Install Node.js, VS Code Editor and Cypress in Windows?

Node.js Installation: 

I previous article I described how to install node.js, VS Code editor and Cypress in Linux platform. Here I will describe the same thing in Windows platform. The steps are as follows. 

1. Go to node.js site and download Node.js  msi/zip file for windows 32 or 64 bit.(I used msi file for Windows 64 bit)
2. Click on downloaded msi file and node.js setup wizard UI will appear as follows.


3. Click on Next button and end user license agreement UI will display as follows.


4. Do the checkbox on to accept terms for license agreement and click Next button, destination folder UI will show as follows.


5. Choose the installation location path(I used default path) and click Next button, the custom setup UI will display as follows.


6. Click on Next button and tools for native modules UI will display as follows.


7. Click on Next button and ready to install node.js UI will show as follows.


8. Click on Install button and installing node.js UI will show as follows.


9. Once installation is done completed the node.js setup wizard UI will show as follows.


10. Click on Finish button and go to Program Files directory of  C drive to check whether the nodejs folder is present.


11. Copy the location path C:\Program Files\nodejs and go to the advance system settings to setup environment variable . Variable name: NODE_HOME , Variable value: C:\Program Files\nodejs


12. Add  %NODE_HOME% to the path and following UI will show.


13. Open command prompt and check node version and node package manager version by typing    node -v and npm -v


VS Code Editor Installation:

Visual Studio Code(VS Code) is a popular and smart editor. In previous article I described how to install and download VS code for Linux platform. Now I will describe the same for Windows platform. 

1. Go to the VS Code website and download VS Code installer(.exe file) click here 

2. Double click on downloaded VS Code exe file and license agreement UI will show as follows.


3. Click on "I accept the agreement" radio button and press to Next button, select destination location UI will appear as follows.


4. Choose installation location path(I used default path) and click on Next button, select start menu folder UI will display as follows.


5. Just click Next button and select additional tasks UI will appear as follows.


6. Check the "Create a desktop icon" box and click Next button, ready to install UI will show as follows.


7. Click Install button and the following installing UI will display.


8. Once installation is done, completing the visual studio code setup wizard will show as follows.


9. Check the "Launch Visual Studio Code" box and click Finish button, Visual Studio Welcome window will appear as follows.


10. To check Visual Studio Code version whether it is successfully installed, just open Command Prompt, type code --version, press ENTER key of keyboard. Installed VC code version will show as follows.


Cypress Installation:

In previous article I described cypress installation in Linux platform. Here I will describe how to install cypress in Windows platform step by step.
1. First create a folder/project(I named it CypressPractice) in your own local directory.


2. Open command prompt inside that folder and type npm init to generate package.json file.


3. In command prompt, type package name, version, description, entry point, test command, git repository, keywords, author, license and type yes, press ENTER from keyboard.


4. To install cypress type npm install cypress --save-dev in command prompt and press ENTER, cypress will install as follows.


5. Open the folder(CypressPractice) through VS Code editor, the folder will open as follows. Check node_modules, package-lock.json, package.json will be created inside that folder.


6. Open package.json file and check cypress version into that file to make sure cypress is successfully installed as follows.


7. To open cypress runner type npm run cypress:open and cypress runner will open as follows.


Here I have tried to explain node.js, vs code editor and cypress installation in easy way. I expect this article will assist cypress lovers who work Windows platform.

Wednesday, August 4, 2021

How to Install Node.js, VS Code Editor and Cypress in Linux?

 Node.js Installation: 

There are different ways to install Node.js in Linux machine. Here, I will describe how to install Node.js via binary archive in ubuntu pc. The installation process is described step by step below.

1. Go to the Node.js website and click the link to download Node.js for Linux Binaries (x64).

2. Create a new folder and keep the downloaded file into it. I have downloaded file Node.js node-v14.17.4-linux-x64.tar.xz

3. Open terminal and create nodejs folder using Linux command as follows

sudo mkdir -p usr/local/lib/nodejs


4. Unzip the downloaded file and copy the file to the directory /usr/local/lib/nodejs and install using following command.

sudo tar -xJvf node-v14.17.4-linux-x64.tar.xz -c /usr/local/lib/nodejs


5. To set the environment variable open profile file using following command from terminal.

sudo nano ~/.profile


6. Write the following code into the profile file and save the file.

# Nodejs

VERSION=v14.17.4

DISTRO=linux-x64

export PATH=/usr/local/lib/nodejs/node-$VERSION-$DISTRO/bin:$PATH


7. Node.js has been successfully installed and configured. To refresh profile use the following command from terminal.

. ~/.profile


8. Check Node.js version using following command from terminal.

$ node -v

Node.js version will show in terminal v14.17.4


9. Check npm version using following command from terminal.  

$ npx -v

npm version will show in terminal 6.14.14


To check normal output use the following command from terminal.

$ npm version 

Normal output of npm version is as follows.

➜  node -v

v14.17.4

➜  npm version

{ npm: '6.14.14',

 ares: '1.17.1',

brotli: '1.0.9',

 cldr: '39.0',

 llhttp: '2.1.3',

 icu: '69.1',

 modules: '83',

 napi: '8',

 nghttp2: '1.42.0',

 node: '14.17.4',

 openssl: '1.1.1k',

 tz: '2021a',

 unicode: '13.0',

 uv: '1.41.0',

 v8: '8.4.371.23-node.76',

 zlib: '1.2.11' } 


VS Code Editor Installation:


VS Code means Visual Studio Code is an smart editor for java script coding. Here, I will describe how to download VS Code and its installation process step by step in Linux machine.

1. Go to the VS Code website and download vs code  

2. Create a new folder and keep the downloaded file into it. I have downloaded .deb file code_1.58.2-1626302803_amd64.deb 

3. To install the downloaded file, open terminal from folder path and type Linux command as follows.
sudo dpkg -i code_1.58.2-1626302803_amd64.deb


4. Visual Studio Code has been successfully installed. To open Visual Studio Code editor, use following command from terminal.
$ code


5. Visual Studio Code editor will be opened as follow.


Cypress Installation:


Cypress uses only javascript language and mocha framework by default. It differs from Selenium. So to install cypress I will use vs code editor that supports javascript code with libraries that required for cypress. I have used the link cypress installation that helped me to install cypress. Here, I will describe step by step how to install cypress.

1. Create a new folder in local machine, I have created a folder named CypressPractice.
2. Open visual studio code editor, go to File -> Add Folder To Workspace and add the folder to visual studio code editor. Folder is added to visual studio code editor as follows.


3. Right click on CypressPractice folder from editor and Open in Terminal as follows.


4. As folder is empty initially, so use the following command from terminal to initialize npm.
init npm


5. Enter package name, version, description, entry point, test command, git repository, keywords, author, license if any of these required and select as per need. Press ENTER and see package.json file will be created under CypressPractice folder as follows.


6. Clear terminal and write the following command to install cypress.
npm install cypress --save-dev


7. After installation cypress, check node_modules and package-lock.json both are created under CypressPractice folder as follows.


8. To check cypress version use the following command from terminal.
./node_modules/.bin/cypress version


9. To open cypress use the following command from terminal.
./node_modules/.bin/cypress open


10. Cypress interface will be visible as follows.


11. Click any item under example folder of Integration directory and see the existing script will be run inside the browser as follows.


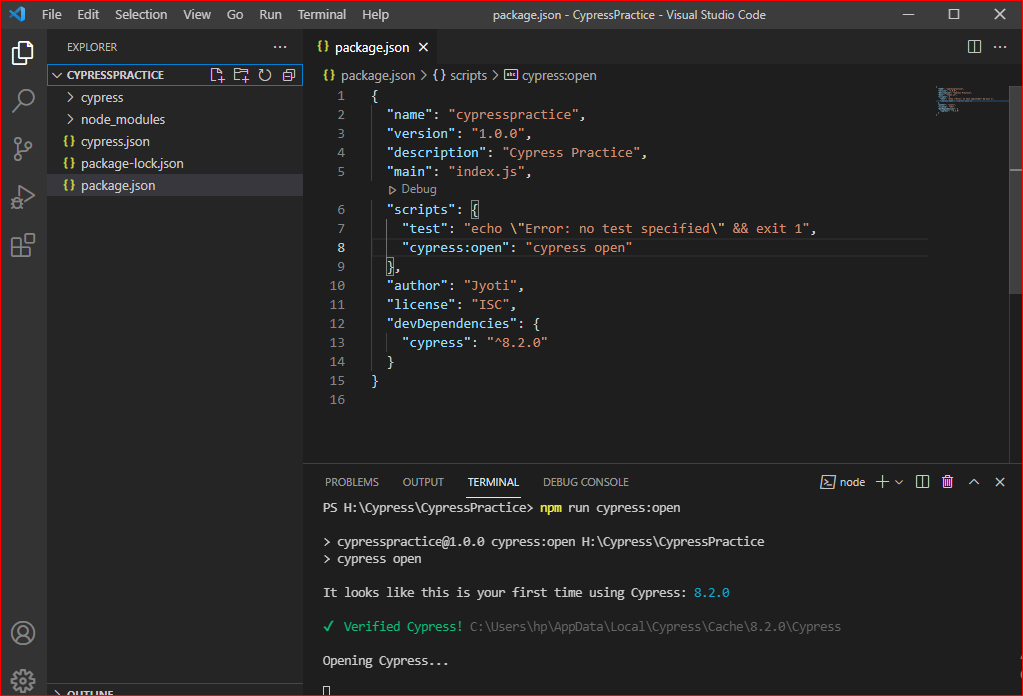
12. To open cypress using npm run command, need to configure into package.json file as follows.
  "scripts": {
    "cypress:open": "cypress open"
  }


13. After using the npm run cypress:open command cypress will be run as follows.


That's all about installation of node.js, vs code editor and cypress. I hope this article will be helpful for Linux user.  Thanks all.