We need to know what maven is.
Maven is nothing but a project build tool like Apache Ant,
Gradle etc. Maven is basically used for java project. It manages a large
project easily. It manages all dependencies to handle the project.
Maven manages different types of jars which are downloaded
from repository. Repository may be central, local or remote repository. Maven
downloads the dependency jar from central repository to local repository called
m2. Maven uses the libraries available in m2 folder. If any new dependency is
to be required then user have to configure the dependency in pom.xml file. POM
(Project Object Model) is the core of any project. It is called configuration
file in which all dependencies are configured. To get all available libraries
which are required for a project visit here.
From the above discussion we have learned a few about maven. Now we need to know about maven setup. Here I have used windows 10 pc for maven setup. Before maven setup we have to install JDK (Java Development Kit). Here I have used JDK1.8.
JDK Installation and Environment Setup:
1. Download "jdk-8u121-windows-x64.exe" from here.
2. Install downloaded JDK file.
3. After installation JDK, setup JAVA_HOME environment variable. Right click on This PC and click Properties

1. Download "jdk-8u121-windows-x64.exe" from here.
2. Install downloaded JDK file.
3. After installation JDK, setup JAVA_HOME environment variable. Right click on This PC and click Properties
4. Click on Advance system settings.

5. Click on “Environment Variables” under “Advanced” tab.

6. Click “New” button under System variable.


8. Select Path under System variables and Click “Edit” button.

9. Append “; %JAVA_HOME%\bin;” string at the end of the path string. Make sure; is available before and after “%JAVA_HOME%\bin” string. Click “OK” button.

10. Click “OK” button from “Environment Variables” popup window.

11. Click “OK” button from “System Properties” popup window.

12. Make sure JDK is installed and java environment variables are properly configured. Open command prompt and type “java - version” that means java space -version. Press “Enter”. Java version and others will be displayed in command prompt.

Maven Installation and Environment Setup:
We have already installed JDK and configured environment variable for java. Now let’s discuss about maven installation and environment setup. Here I have used maven 3.3.9 version.
1. At first, download “apache-maven-3.3.9-bin.zip” file from here.
2. Extract the downloaded zip file to unzip and keep the unzip folder in your preferred directory. Here I have used the directory “G:\Testing_Project\EShopper” and my unzip folder is “apache-maven-3.3.9-bin”.

3. To setup “M2_HOME” environment variable, right click on “This PC” and click “Properties” from menu.
4. Click on “Advanced system settings”.

5. Click on “Environment Variables” under “Advanced” tab.

6. Click “New” button under “System variables”.

7. Type “M2_HOME” into “variable name” field and enter unzip maven folder’s root directory’s path. Here path is: “G:\Testing_Project\EShopper\apache-maven-3.3.9-bin\apache-maven-3.3.9”, click “OK” button.

8. Now Click “New” button under “System variables” again.

9. Type “M2” into “variable name” field and enter string “%M2_HOME%\bin” into “Variable value” field. Click “OK” button.

10. Now Click “New” button under “System variables”.

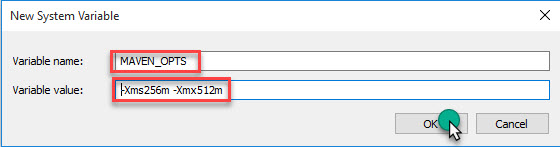
11. Type “MAVEN_OPTS” into “variable name” field and enter string “-Xms256m -Xmx512m” into “Variable value” field. Click “OK” button.
12. Select “Path” under “System variables” and click “Edit” button under “System variables” section.

13. Append string “;%M2%” at the end of the System variable path and click “OK” button.

14. Click on “OK” button from “Environment Variables” popup window.

15. Click on “OK” button from “System Properties” popup window.

16. To ensue maven is properly setup, open command prompt. Type “mvn --version”.

17. Press “Enter” and check to see maven setup is properly done and output comes as follows.

No comments:
Post a Comment